Pages

Saturday, May 11, 2013

Laundry Closet Finale and Reveal

It's been a while.  I would love to say I had a good reason for this project to take so long, but really, it was just life.  Either way, it's finished! And I'm extremely happy with the results.  To take you back to where I left off: Parts 1 and Part 2.1


I've come a long way since then and I apologize for the pictures in advance. I've gotten a new phone recently, so the pictures should be a bit better, but the lighting in the area is still horrible.  This area of the house gets no direct sunlight and only gets a wish of sunshine during the day.  

Since all the walls are prepped, the first order of business was to find a pick out my cabinet for the corner.  This definitely took 2 people: one to hold it up, one to screw it into the stud.  This also prompted to me to purchase a stud finder.  I'm usually very adept at finding studs in the wall, but this closet seems to defy all logic. 

Sunday, May 5, 2013

No posts in the month of April?  None before that?  What am I doing??

Well, I have a job and it sometimes takes up quite a bit of my time.  I've also been working outside quite a bit to get a landscape bed planted and getting all the others in tip top shape.  Lastly, I haven't had motivation or money.  Both are key to brain storming and planning new projects!

So, I promise I will have a post up within the week on my finishing my latest project, the Laundry Closet.  I've put the finishing touches on it and I'm excited to share!  I've also gotten a new phone with a better camera, so I hope it helps.

In the next month, I also plan to start on a few projects for my Future Guest Bedroom.  Get excited!

Let me know what you think!  Leave a comment or send me an email.

Tuesday, March 26, 2013

Closet Organizer Giveaway!

I'm sure you've all heard of ClosetMaid and I have great news, they're having a giveaway!  The Love Your Closet Sweepstakes is giving away 2 awesome closets like the ones below


Visit the ClosetMaid Facebook page or @ClosetMaid #Love Your Closet Sweepstakes to enter the LoveYourCloset Sweepstakes!

I know I'll be entering, so make sure to share it with all of your friends!  Click the Facebook link below to share.

Share This Article on Facebook

Saturday, March 23, 2013

Resurfacing My Lovely Island Butch Block

If you haven't read my previous post about my DIY kitchen island (Part 1 and Part 2), then let me introduce you to my kitchen island.


It's been at least 6 months since I completed this project and I've succeeded in beating up the counter top like no other.  I did the initial conditioning of the top and didn't do any follow through.  I know better!  No really, I do.  I've already stained it with beet juice (the ugly dark gray blob) and there are small water spots on it.  It's begging me to be oiled.  Overall, the top was just looking dull and much lighter than when I started, which is a sure sign that it needs some love.  

Monday, March 18, 2013

Quick Update

It's been a bit since I've posted any projects, I know.  I'm trying to get my next project together, but I keep running into roadblocks.  Such is life, right?  Planning my work travel has taken more time than expected.  It's also been a VERY expensive month.  First, then fence and now my refrigerator!  The ice maker is on the fritz and since I HATE the layout of this fridge, I decided that it's time.  I will be the owner of a (hopefully) lovely side-by-side fridge tomorrow.  Luckily, my upcoming DIY projects will be inexpensive, so I guess I have even more incentive to get them going!

Have any suggestion for DIY projects?  Let me know!  Leave me a comment or send me an email.

Thursday, March 7, 2013

Project: Floating Shelves

Sometimes, you just look around the room and say "This room is missing..... something."

I had done that for a while in my living room.  So I put a picture on the wall.  That wasn't it.

Then I got lamps.  That helped, but still wasn't 'It.'

One day, when I was trying to sleep, it dawned on me:  I didn't have any shelves.  I didn't have any place to set 'things.'  I didn't have a place for a sense of ME.  My walls were also practically bare.  Painted, but bare.

I don't care of bookcases, but I knew I wanted shelving.  Built-ins were out of the question as they can be somewhat expensive and require more handy work than is all of my family, combined.

As with a lot of my ideas, I started with research.  I figured out what I wanted first and then researched the options available.  It happens that my beloved Ikea has floating shelves.  I liked the options at Pottery Barn, but let's be honest:  Do I seem like the person to buy the Pottery Barn option over the Ikea option?  That would be a no (under most circumstances).

To see if my plan would really work out, I resorted to making a life-size representation.  I seem to do that a lot, right?  It works.

Friday, March 1, 2013

Spring Cleaning FEVAH!

There is a (slight) warmth in the air that can only mean one thing: Spring is coming.  For me, this means spring cleaning.  Why?  Because I'm in a winter funk and I MUST find something to bring me out of it.  I swear, there hasn't been a sunny day in weeks.

I'm starting to brainstorm and plan out my things to tackle in the next few coming months.  There are a few things I've put off and some older projects that I did before I started the blog.  I hope to have a full slate of items to keep me (and you) occupied and active.

What are your plans for spring?  Have anything awesome planned?  Or are you just dreaming of when you can go outside without a sweatshirt?

Sunday, February 24, 2013

Mini-Project: Shoe Drying Tray

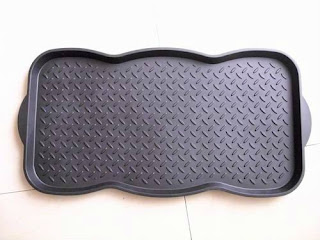
I've stone-filled shoe trays on Pinterest before and thanks to the endless rain we've gotten over the past 2 weeks, I thought it might be time to give it a try!  My shoes have been wet, muddy and grassy but I was getting tired of leaving them in the entryway on the rug.  So, when I was at the store buying cheap runner rugs for the office, I spotted this shoe tray:


That reminded me of the few pins I've seen with this type of setup.  This was $4.97 and should have room for 3 pairs of shoes.  I went over to check out the rocks in the crafts section, but MAN were they expensive.    As in $5 for 2lbs of smooth river rocks.  Over to Dollar Tree, I went.  Sure enough, after some riffling through their decorative rock area, I found the large river rocks that I was looking for.  I wanted the multi-color version.  Now, I will tell you that I also got a small pouch of rocks from Lowes because they had more unique and eye-catching colors.  However, I only used 1 of those (also $5) and mixed it in with the rest of the Dollar Tree version.  $.50 per 1 pound of rocks is cheaper than $1 per pound of rocks.  

Saturday, February 23, 2013

Not-SO-DIY Fence and Misadventures

As a followup on my 'Know when to hire, when to DIY' post, I thought I'd at least show off the wonderful fence that now adorns my yard.  Even though someone else was doing the project, it wasn't without at least 1 hiccup.

But before I get to the 'After' picture, I want to share some tidbits that I learned.  I did my homework with selecting a contractor.  There are quite a few fence companies in the area and I wanted to make sure I didn't jump at the first person that came out for a quote.  So, I used the linear footage information from the a single quote I got 2 years ago to get quotes from everyone else.  I had everyone quote the exact same linear footage, layout and fence material so I could compare apples to apples.  What I found was really interesting!  The prices had about a $500-$600 range for an entry type of vinyl fencing.  I don't always recommend going with the lowest price.  Sometimes it's for lower quality materials, sometimes it doesn't include important items and sometimes the company may not be very reputable.  Do your research.  What I learned about the lowest bid was that they sourced their materials from another fence company (their quote was higher by about $200) and they were reputable.

Also, trust your instincts.  One company lost any chance at my business because I didn't like their salesman.  Scoffing at my concerns isn't a great way to get my business.  If their salesman was like that, I can only image what the installers were like.

After I selected the company, got a full, on-site quote, I ended up selecting another fence style that was the next step up in price.  I don't like thin pickets.  Don't install something you hate that's permanent.  Because, guess what?  It's permanent.  Or really expensive to change.

Side Note:  If you live in the Delaware area and are looking for a fence, check out ABC Fencing.  They're the contractor I picked and couldn't be happier!  I didn't get anything to plug them, they just did a great job!

Misadventure #1 HOA, Land Owner, Survey, Building Permits, oh my.

Saturday, February 16, 2013

Mini-Project: Serving Tray

I was cleaning up my ottoman a week ago and as I was cleaning the tray on it, I had a moment of genius.  This cheap tray, which I've had for 3+ years, could get a new lease on life!  First of all, it just doesn't match anything.


I got this lovely tray at Ikea for about $8 because I got tired of not having a place to set my drink.  Now, it's time to bring it into the style of the rest of my home.  I have dark wood all over.  Luckily, my brilliant idea was that I already had the gel stain (leftover from my oak vanity makeover) to transform it!  

Saturday, February 9, 2013

Back to Basics Series

I have found that sometimes DIY projects aren't as difficult as they seem.  Knowing some basic skills make things go much more smoothly.  The only problem is...some people skip over the steps in doing the basic tasks for a project.  I know I'm guilty of that too, so I wanted to go allll the way back to some basic skills that come in handy.  If I can do it, I'm sure anyone can do it.  Some of these I've picked up from my parents along the years, some of them I figured out on my own and some of them I created my own method.

So what basic skills would you like to see explained?  How to hammer in a nail?  How to use a screw gun?  How to drill a basic hole?  Let me know!  If I know how to do it, I'll show you.  Send your ideas to me or leave a comment!

Know When To DIY and When to Hire

It's been a crazy few weeks.  I went on a work/vacation trip for 9 days to escape the cold weather and had such a relaxing and productive trip!  But before that, there was.... an incident.

A dog got loose in the neighborhood and promptly ran over to my yard and started fighting with my dog.  My dog is always on a leash and this was almost a disadvantage.  Luckily, my dog was perfectly fine, but it brought back a major homeowner decision back to the surface: a fence.  I've wanted a fence in my yard since I moved in.  Living in a subdivision with an HOA, I knew a chain fence wasn't going to cut it.

Now, the decision about the fencing was not only a convenience decision, it was a safety concern.  Do I want to be able to just let my dog out the door without having to bundle up?  I would love that!  Do I want a place for her to run around?  Yes!  Do I want to take the chance of the next dog fight ending without injuries?  Heck No.  Do I want to take the chance of the next dog fight ending with a dog attacking me?  HECK NO.  I've been bitten before and the amount of damage that can be done in seconds is alarming.

The style I decided to go with!

This whole decision took me back into the realm of DIY.  Was this something I could do myself, with some help?  After only a moment of thinking, the answer was a resounding no.  See, there are some factors you should take into account when deciding whether to DIY or hire someone:

Monday, January 14, 2013

My Dream Guest Bedroom

I'm going to venture in a different DIY direction with this post.  This time, it's DIY decorating.  I find decorating a smidge easier than doing things around the house, but it's still a challenge.  I'm a very logical person and I have trouble seeing the big picture and end result sometimes.  That doesn't stop me from dreaming though!

My lovely home came with 3 bedrooms, one more than I needed.  I use one for storage and I hope to use the other as a guest bedroom some day.  Considering I'm starting from scratch, it's going to take a while.  So, to start off on the right foot, I've been collecting inspiration to help guide me to a beautiful end result.

When I think of a guest bedroom, I think of a few key words:  comfortable, clean, classic, and relaxing.  I don't want a room where someone is afraid to climb into bed.  A guest bedroom is supposed to be a home away from home!  I would also like to use a teal/aquamarine/blue color in the room as I can't include that color in my own guest bedroom.  So here are a few inspiration bedrooms:

Saturday, January 12, 2013

Thinking Outside the Shower

This is going to be a short post, but sometimes complicated problems can have simply, easy solutions... if you think outside the box. When you move into a new house, the last thing you think about is 'Will my shower caddy fit in this shower?' I quickly realized that this was the case in the master shower.  Not only would my hanging shower caddy not fit..... none would fit.


See that really short shower arm?  It only sticks out 1" from the wall before it curves downward.  See that white shower?  It sticks out from the wall 1.5".  See the issue?  There's no room to hang ANYTHING.  

Tuesday, January 8, 2013

Closets, Closets Everywhere

I have a few unfinished projects around the house, but onward and upward!  While recovering from the holidays, I realized what a mess my closets had become.  I've never been able to put my finger on it, but they've just not been quite right since I moved in.

I have two 6.5' reach-in closets in the master bedroom that should provide plenty of room to hold all of my clothing.  I wish that were the case currently but I seem to have encountered a case of the Builder Basic again.  They set things up for success, but still managed to be failure!

I told you it was getting bad!

Monday, January 7, 2013

Laundry Room: Part 2.1

I've officially started work on the laundry area!  I've already done some basic planning and found inspiration of what my ideal laundry area would look like in my Project: Laundry Room, Pre-Planning post.  I went through a few iterations of ideas, but finally decided that I wanted a single cabinet with open shelving.  A little bit open, a little bit closed, the best of both worlds!

So far, this project has went fairly smoothly.  It's been quite involved, but each step has been manageable   I've had to call in some backup for sawing because.... well, I like my fingers.

Project Prep

Deciding on a final plan and the details was difficult.  This is what it looked like before:


Tuesday, January 1, 2013

I've been neglecting my blog, bad bad bad.

I know, it's been a while since I posted about my latest project.  Or any project for that matter.

I was trying to write an interim post about some older projects, but that just hasn't happened.  I've started on the Laundry area, but had to put the completion and finishing touches on hold.

I promise I have a good reason!  I had to have surgery and have been recovering.  After recovering, I had to catch up at work.  Then I had a trip for work.  Then I had to catch up at work.  Then it was Christmas.  And now I'm sick.  To appease my guilt on abandoning my blog, I'll try to get a post about the laundry area up ASAP!

And to all those new to my blog, feel free to repin any pictures you see here, but also leave me some feedback!  Ask questions, tell me your own stories, or just let me know what you think of my projects and posts!