Let's me introduce you to my bathroom:


As you can see in the 2nd picture, we've got a variety of color bases going on here. The floor is a mixture of grayish cream, the vanity top is cream with gray* swirls in it and the cabinet is yellow/honey oak. Really, builder? Really?? Yellow, cream, gray and honey oak just don't go well together.
This project started with lots of research. How much does a vanity top cost? How much does a replacement cabinet cost? As it turns out, more than I want to spend. When I thought about actually trying to replace a cabinet, the realization that it involved plumbing, tearing something out and caulk was enough for me to put the definite NO stamp on that idea. I like paying my student loans more than I would like a new cabinet and vanity anyway.
Thanks to Pinterest, I knew exactly what I wanted to do. After reading her tutorial, I thought 'This is just finger painting in the lines!' There's no need to reinvent the tutorial since she did a great job explaining the process. Instead, I'll give you my tips and lovely results!
First, buy the stain she recommends. It's worth it. Buy the gel coat too, it's also worth it and cheap. I didn't bother with using a foam brush though because I really liked finger painting. Tip #1 (which resulted in Misadventure #2) Either label the cabinet door position or leave the hardware on the cabinet. When I put mine back on, it took quite a bit of adjusting to get the doors to lineup and it's still not lined up well.


Another real life lesson: Use a double-glove system. You'll thank me later. But can you see how awesome it looked after the very first coat? The tutorial says to not be afraid of being streaky and I agree, just go to town on it! Try not to let it get too gunky in the corners, but it's pretty foolproof. Just ask this fool.
Misadventure #1: The sink panel.

I thought, like most cabinets, taking out this panel would be easy. So, I get under the sink and try to rotate the odd pieces that hold it to the cabinet. No movement. I realize it's held on both sides, the top AND bottom. Crap. I just so happen to have a set of 2nd hands at the house this time and called for reinforcements. Still no luck. Then it hit me: The builder stapled the panel to the cabinet and clips. STAPLED. Who does that? These guys. So I had to end up staining it in place, trying to get enough into the edges so there wasn't view-able honey oak.
The second coat looked even better, though still had some light spots. I ended up using a new sock for ever coat since they had dried in between.

The 3rd coat was magic. Pure magic. It filled in all the gaps of stain and looked woooonderful! While I waited for it to dry for a few days, I took the time to pick out cabinet hardware. You don't stain a masterpiece and then leave it without pulls to keep the finish!
Awesome DIY Tip #2: Lowes and Home Depot are good about returns. Don't know what cabinet pulls or knobs you want? GET THEM ALL. And do like I did, put them in place, take lots of pictures, send them to your friends, family and coworkers and ask their opinions on this very important matter (you probably think I'm joking.... I'm not).


When you're done, take the rest back and get more sets of what you need. After finishing the top coat, I finally got to put the winning set on the drawers. Most home improvement stores sell guides like this that also include the drill bit you need: http://www.lowes.com/pd_273758-81227-AN0201C-G-Q1_4294934474__?productId=3473957&Ntt=liberty&pl=1¤tURL=%3FNtt%3Dliberty&facetInfo=
I would have had no clue where to get a single drill bit had it not been in the set. Tip #3 This same drill bit can be used for many, many things around the house as anchoring things in drywall also use this same size bit.
To place the pulls, just take your time in measuring, mark at the center of the drawer and use the guide to mark the holes for drilling. Using the drill bit was also very simple in this case: make sure the drill is straight up and down and use a small bit of pressure to get all the way through the drawer face. A few of my holes weren't exactly straight, but they ended up working just fine.
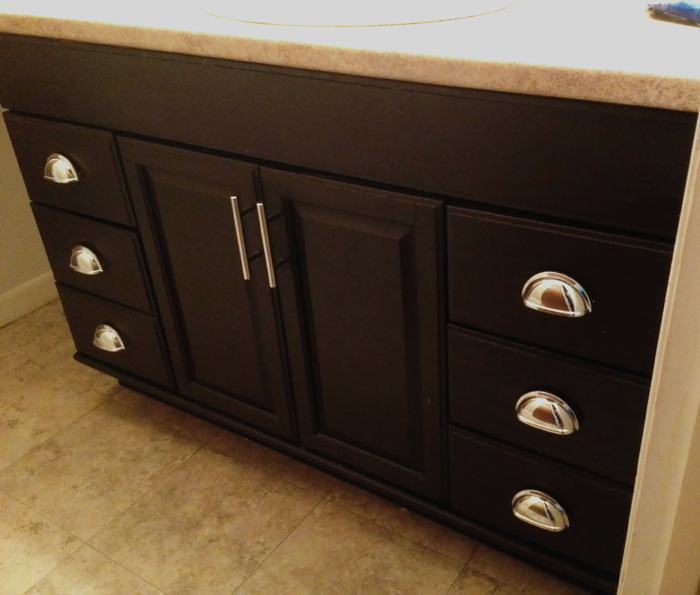
Without further ado, here's the final result!


Overall, this was a good starter project. If you take the cabinet hardware aspect out of it, you don't even need power tools. If you can finger paint, you can do this, I promise. The end result is WELL worth it. I didn't have to replace the cabinet or top and I got a completely different look. A modern look, none the less. One of these days this house may have some style!
PS I know there aren't any knobs on, see Tip #1. I didn't want to put them on until I knew they were lined up.
*Yes, gray swirls. There are 3 bathrooms in this house, all with the same grayish floor and oak cabinets, yet the other have brown swirls. Why this one has gray, I will never know.

Hmm it appears like your blog ate my first comment (it was extremely long) so I guess
ReplyDeleteI'll just sum it up what I wrote and say, I'm thoroughly enjoying your blog.
I too am an aspiring blog blogger but I'm still new to everything. Do you have any points for newbie blog writers? I'd certainly
appreciate it.
Also visit my blog post; event planning Randburg
Thanks for your post. I'm inspired to do the same for our upcoming renovation project. So excited!
ReplyDeleteThank you so much for sharing informative blog. Hope you continue to share more of your ideas. I will definitely love to read. Keep up the good work! Cuisine et salle de bain
ReplyDeletelong vertical painting
ReplyDeletelong vertical artwork
3 piece canvas painting
cow face painting
3 dimensional flower wall art
3d oil painting on canvas